前の「JavaFX プロジェクトの作成、Scene Builder」では Scene Builder で BorderPane を親(root)コンテナとして作成したが、そのコンテナを処理するコントローラーは BorderPane の派生クラスではなかった。 今回は、VBox を親(root)コンテナとして作成し、それを処理するコントローラーを VBox の派生クラスとする。こうすることの利点は、この親(root)コンテナが再利用可能になること、コントローラーにコンストラクタの引数を通じてコントローラーの処理に必要となる情報を渡すこと、である。
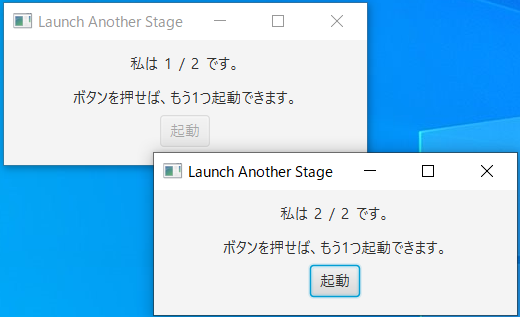
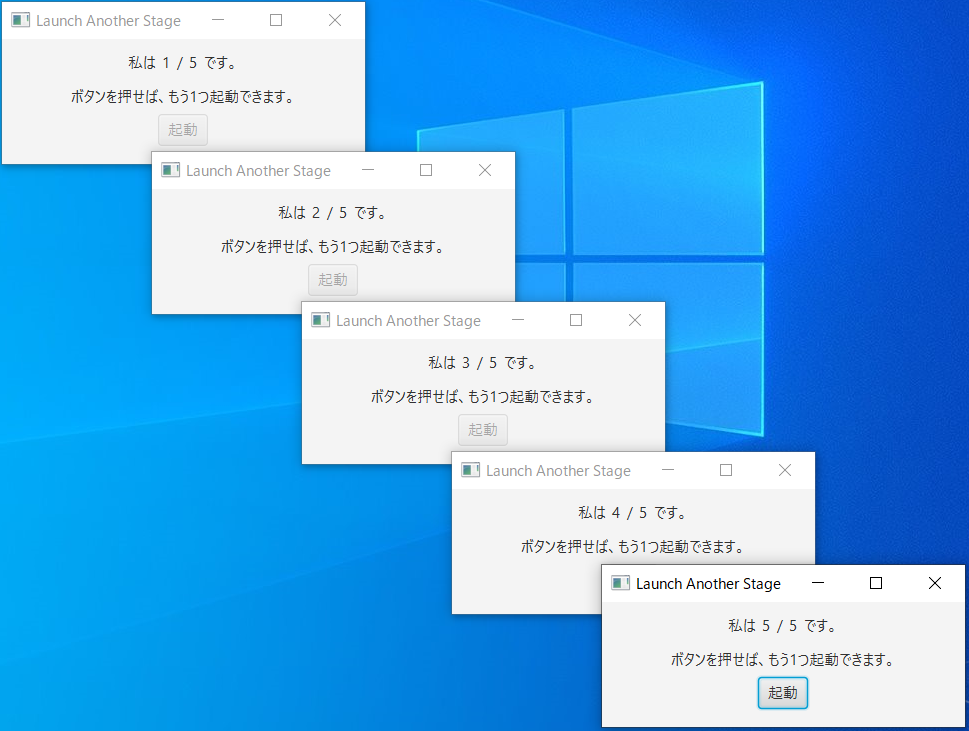
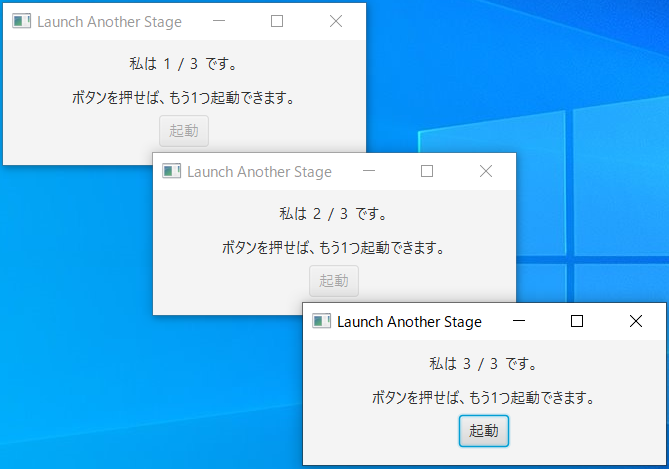
作成するのは LaunchAnotherStage で、stage(ウィンドウ)内に自分に関する情報、「私は (何番目)/(総数) です。」を表示する。「起動」ボタンを押すことにより、高々1個だけ、同様な stage(ウィンドウ)である自分の子を起動できる。ウィンドウ右上にある閉じるボタン「X」を押すと、自分と(あれば、子ウィンドウ)を終了させる。下図は2個起動した状態、更に3個、合計5個を起動した状態、4個目の閉じるボタン「X」を押して、4個目と5個目を終了させた状況である。注意点は「私は (何番目)/(総数) です。」の(何番目)は変化しないが、(総数)が変化することである。
Scene Builder で VBox を親(root)コンテナとして利用し下図のように作成する。(LaunchAnotherStage の Eclipse のプロジェクトsrcのzipファイルはこちら。)
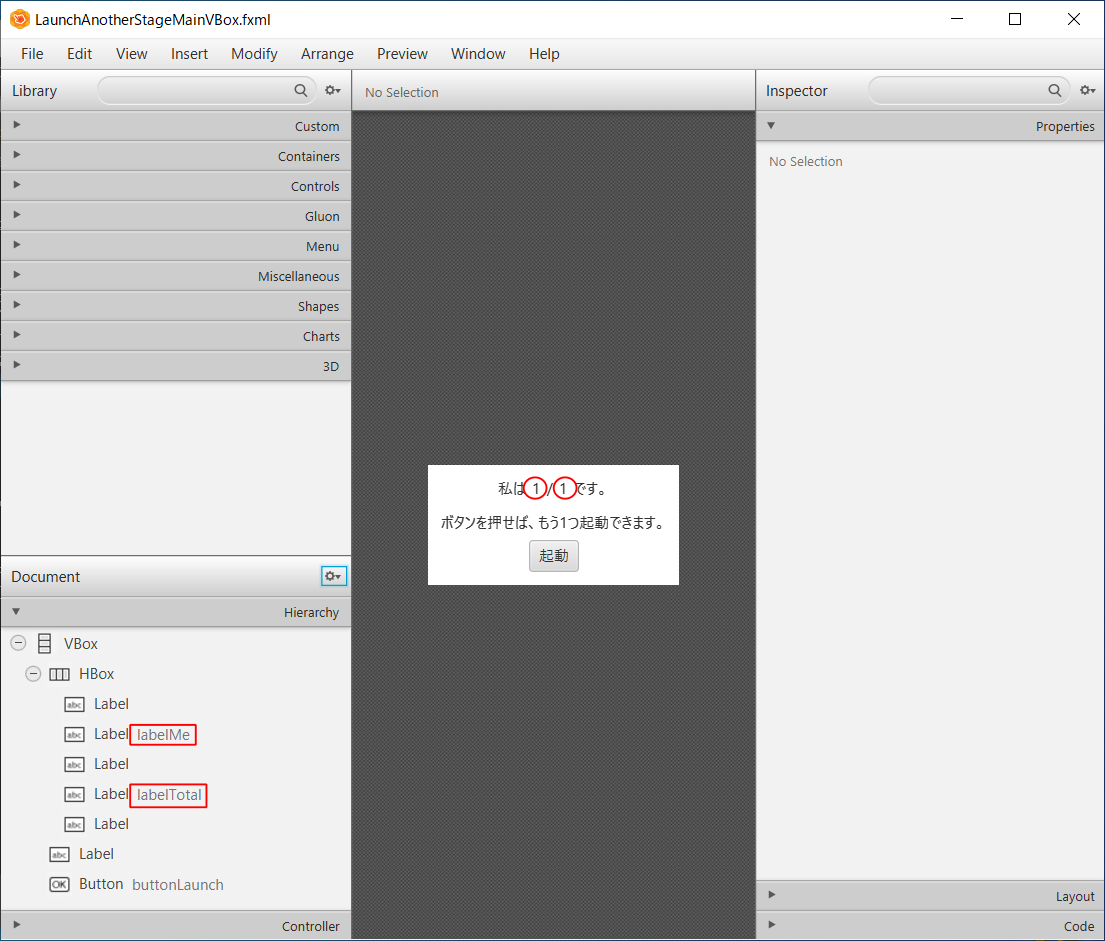
今は共に1が入っているが、後で変更する必要がある「1 / 1」の左のラベルを labelMe、右を labelTotal と名づける。「起動」ボタンを buttonLaunch と名づける。
Scene Builder で作成される fxml ファイルを LaunchAntherStageMainVBox.fxml とする。このファイルを VBox を派生したクラスファイル(LaucheAnotherStageMainVBox.java とする)で利用できるように、下図のように、Controller class に何も記入せずに、Use fx:root construct をチェックする。

以上で、Scene Builder での作業は終わった。
上述の VBox のクラスファイル(LaucheAnotherStageMainVBox.java)の説明は後に回し、この VBox を利用する、Main クラスの start(Stage) 関数を見てみる。
public void start(Stage primaryStage) {
	LaunchAnotherStageMainVBox root = new LaunchAnotherStageMainVBox(primaryStage);
	Scene scene = new Scene(root, 290, 100);
	primaryStage.setScene(scene);
	primaryStage.setTitle("Launch Another Stage");
	primaryStage.show();
}
root に上述の VBox のインスタンスを代入し、それを Scene に入れ、それを primaryStage に入れ、タイトルを設定し、表示している。注意点は上述の VBox のコンストラクタに引数を利用して、LaunchAnotherStageMainVBox に primaryStage を渡している所である。これをどのように利用するか?は後述する。
LaucheAnotherStageMainVBox.java の説明に移る。コンストラクタでは引数で与えられた stage を後で利用するために、インスタンス変数に保存している。それ以降の処理で Scene Builder で作成した VBox のクラスが LaunchAnotherStageMainVBox であり、そこにあるラベルやボタン等の処理をするのも LaunchAnotherStageMainVBox であるように設定している。try 文にある fxmlLoader.load() 辺りで @FXML の次行以降に書かれた LaunchAnotherStageMainVBox を初期化する initialize() が呼ばれる。従って、必要な初期化、イベントハンドラー、チェンジリスナーなどをここに記述すればよい。
public LaunchAnotherStageMainVBox(Stage stage) {

	this.stage = stage;

	FXMLLoader fxmlLoader = new FXMLLoader(getClass().getResource("LaunchAnotherStageMainVBox.fxml"));
	fxmlLoader.setRoot(this);
	fxmlLoader.setController(this);

	try {
		fxmlLoader.load();
	} catch (IOException exception) {
		throw new RuntimeException(exception);
	}

}
「起動」ボタンを押したときに起動される Stage(ウィンドウ)をクラスとして下記のように定義する。
public class LaunchAnotherStage extends Stage {

	public LaunchAnotherStage() { // same as the start(stage) of Main class
		try {
			LaunchAnotherStageMainVBox root = new LaunchAnotherStageMainVBox(this);
			Scene scene = new Scene(root, 290, 100);
			this.setScene(scene);
			this.setTitle("Launch Another Stage");
			this.show();
		} catch(Exception e) {
			e.printStackTrace();
		}

	}
}
内容は Main クラスの start(primaryStage) と同じである。これにより、最初のウィンドウはこのstart(primaryStage)によるもの、それ以降のウィンドウは LaunchAnotherStage のインスタンスであり、厳密にいえば異なるが、目に見えるウィンドウは LaunchAnotherStageMainVBox のインスタンスであるので、同じである。
クラス LaunchAnotherStageMainVBox で処理をする必要があるのは
- 「私は (何番目)/(総数) です。」の(何番目)と(総数)を適切に求め、ラベルに設定する。
- 「起動」ボタンが押されたら、自分の子として、クラス LaunchAnotherStage の新たなインスタンスを作成し anotherStage に代入し、適切に表示し、「起動」ボタンを利用不可能にする。また、anotherStage が閉じられる場合には anotherStage を null にし、「起動」ボタンを再度利用可能にする。
- ある LaunchAnotherStage のインスタンスが(右上の閉じるボタン「X」を押されたことにより)閉じられたら、その子がある場合にはその子の stage を終了し、(総数)を適切に修正する。
(1)
(何番目)を保持する変数 me と(総数)を保持する変数 total を宣言する。me の方はインスタンス変数で良いが、 total の方はどのインスタンスでも同じ値なので、static 変数(クラス変数)とする。また、me が意味する(何番目)は変化しないが、total が意味する(総数)は表示されているウィンドウの個数が変われば変化し、それに応じて labelTotal を書き換える必要がある。そのために、total を IntegerProperty として定義すれば、total の変化を自動的に追跡してくれるので、そのチェンジリスナーで labelTotal を書き換えることが可能になる、ことを利用する。まず、宣言の部分は、
public static IntegerProperty total = new SimpleIntegerProperty(0); // initial value is zero

public IntegerProperty totalProperty() {
	return total;
}

public int getTotal() {
	return total.get();
}

public void setTotal(int i) {
	total.set(i);
}

private int me = 0;
total のチェンジリスナーの部分と total、me、labetTotal、labelMe の初期化の部分は、次の通りである。ただし、実際は、関数 initialize() の中に記述する。
total.addListener(new ChangeListener<Number>() {

	@Override
	public void changed(ObservableValue<? extends Number> ov, Number oldValue, Number newValue) {
		labelTotal.setText(""+newValue.intValue()); // set labelTotal to be the current value of total
	}

});

total.set(total.get()+1); // increase total by one
me = total.get(); // me is the same as total

labelTotal.setText(""+total.get());
labelMe.setText(""+me);
すなわち、1つ目は、total の値が変化したら呼び出される関数 changed() で、変化後の新しい値を labelTotal に表示するように、チェンジリスナーを設定している。次の2行は total と me の初期値を、最後の2行はこれらに対応するラベルに値を、代入している。
さて、次の(2)で必要となる、ウィンドウに関する基本的なことを述べる。これに関しては「JavaFXとウィンドウ」を参照させていただいた。
ある stage が閉じる前に何か処理をさせるには、
stage.showingProperty().addListener(new ChangeListener<Boolean>() {

	@Override
	public void changed(ObservableValue<? extends Boolean> ov, Boolean oldValue, Boolean newValue) {
		if (oldValue && !newValue) {
			// stage is closing
			// do what you want
		}
	}

});
の // do what you want の所に行いたい処理を記述する。
ある stage が他の anotherStage を閉じるには、
anotherStage.fireEvent(new WindowEvent(stage, WindowEvent.WINDOW_CLOSE_REQUEST));
とすればよい。これらを利用するために、次のインスタンス変数を宣言する。stage にはコンストラクタ LaunchAnotherStageMainVBox(stage) の中で有効な値が代入される。
private Stage stage = null; // parent stage of myself
private LaunchAnotherStage anotherStage = null; // child stage of myself if buttonLaunch is pressed
(2)
「起動」ボタンが押された時のイベントハンドラーの設定は次のようになる。
buttonLaunch.setOnAction(new EventHandler<ActionEvent>() {

@Override
public void handle(ActionEvent event) {
	buttonLaunch.setDisable(true);
	anotherStage = new LaunchAnotherStage();

	// move anotherStage to the right and to the down from the original center position
	anotherStage.setX(anotherStage.getX()+120*(total.get()-1));
	anotherStage.setY(anotherStage.getY()+120*(total.get()-1));
	anotherStage.showingProperty().addListener(new ChangeListener<Boolean>() {

		@Override
		public void changed(ObservableValue<? extends Boolean> ov, Boolean oldValue, Boolean newValue) {
			if (oldValue && !newValue) {
				// anotherStage is closing
				anotherStage = null;
				buttonLaunch.setDisable(false);
			}
		}

	});
}

});
すなわち、「起動」ボタンを利用不可能にし、LaunchAnotherStageの新しいインスタンスを anotherStage に代入し、表示位置を(余り重ならないように)修正し、この anotherStage が閉じられる時に、anotherStage に null を代入し、「起動」ボタンを再度利用可能に戻す。
(3)
LaunchAnotherStageMainVBox の親 stage が閉じる時の処理を行うチェンジリスナーの設定は次の通りである。
stage.showingProperty().addListener(new ChangeListener<Boolean>() {

	@Override
	public void changed(ObservableValue<? extends Boolean> ov, Boolean oldValue, Boolean newValue) {
		if (oldValue && !newValue) {
			// stage is closing
			if (anotherStage != null) {
				// close anotherStage
				anotherStage.fireEvent(new WindowEvent(stage, WindowEvent.WINDOW_CLOSE_REQUEST));
			}
			// revise total properly
			total.set(me-1);
		}
	}

});
すなわち、この親 stage が閉じられる時に、anotherStage が起動されていたら、この anotherStage を閉じるようする。また、この親 stage が終了するので、それに応じて、total を me – 1 に変更する。
この LaunchAnotherStage の Eclipse のプロジェクトsrcのzipファイルはこちら。実行ファイルはこちら。